
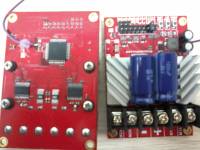
Take 2 Roboclows and connect with drives and power like below.
Roboclows need outside reset signal. In order to provide this, take cables reset (look at previous article) and solder it to a reset path in Roboclows (see below).
For properly communication with Panda board, you need set correct RS address for each Robobclow. Also you need set correct type communication and supply voltage.
Every RS device must have unique communication address. Roboclow for front wheels has address 0x80, Robobclow for rear-wheels has address 0x81. Default programmed address is 0x80, so you need change only one. In order to change address click “MODE” button on Roboclow board. Now you see 7 diode blinks one by one separated by longer diode off. It's mean board has address 0x80. Click “SET” button ones to increment to 0x81. If you see 8 diode blinks, click “LIPO” button to accept changes.
In this project we use 12V battery (4 cells). We need set it. Click “LIPO” button to start programming mode. Now click “SET” button until you saw 5 diode blinks one by one. Now click “LIPO” button to save.
For more information see documentation.